I always knew that within the first batch of blog posts I wrote, I wanted to to do something myself (i.e. a DIY). The question evolved to become, what will be the, "it," be that I do myself?! With jackets of the army genre trending and glimpses of embellished jackets in magazines and online, it became clear that customizing my own army jacket would be an interesting endeavour. But, it was still fuzzy in my head as to how I would approach this.
Flipping quickly through a fall magazine was the activity through which I found my final inspiration; some sort of photo exuberayting incredible cool caught my eye and it's attention. The photograph featured a woman (inevitably a model) wearing not much, but an army jacket was certainly in the mix. The seriously rockin' thing is that written across the full back of the jacket was, "God Save the Queen," in thick white paint stokes. I WAS MOST DEFINITELY DOING THIS. No ifs, buts or ands. The idea had been birthed (if that makes any sort of sense). But of course as you'll later see and understand, I wrote something entirely different on the jacket.
Flipping quickly through a fall magazine was the activity through which I found my final inspiration; some sort of photo exuberayting incredible cool caught my eye and it's attention. The photograph featured a woman (inevitably a model) wearing not much, but an army jacket was certainly in the mix. The seriously rockin' thing is that written across the full back of the jacket was, "God Save the Queen," in thick white paint stokes. I WAS MOST DEFINITELY DOING THIS. No ifs, buts or ands. The idea had been birthed (if that makes any sort of sense). But of course as you'll later see and understand, I wrote something entirely different on the jacket.
The journey of a DIY begins here. For me, this is Michael's, for others perhaps this photo represents any local creative crafting store that would prove worthy of a DIY army jacket. Here I often find, even if you come in with a list, what they have to offer will often induce further inspiration.
The next step is to find the army jacket of your choice, because even though this is a DIY, I am not capable whatsoever of creating one of these suckers. I browsed various typical clothing stores as they carry army jackets for fall, thus fulfilling our DIY needs. Ironically, I also ventured into the local army surplus shop in hopes of the perfect authenticized army jacket, but I was left dumbfounded and empty handed - I was sure I would have found it here!
Supplies:
- Army Jacket
- Bristol Board and other cardboard
- Fabric Paint in your chosen colour - be sure it's the kind that shows on dark fabrics (I used white for writing and considered gold for possible stencilling)
- Paint Brushes
- Chalk
Steps for DIY Army Jacket:
2. Choose what you wish to write on your jacket.
3. Cut up Bristol board in shape approximately the size of the back of your jacket.
4. Use pencil and paint to practice spacing and painting your message.
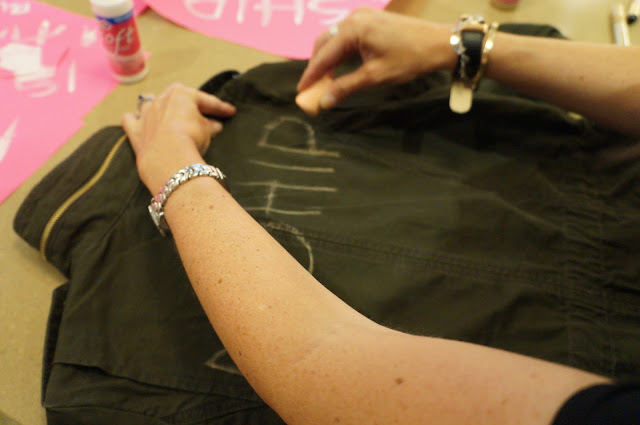
5. Once finalized, use chalk, which allows for erasing, to perfect writing on the back of your jacket.
5. Once finalized, use chalk, which allows for erasing, to perfect writing on the back of your jacket.
6. Paint over chalk with white fabric paint. It's best to paint multiple layers so that letters are thick and concise.
7. Leave to dry based on the instructions on your selected paint bottle.
7. Leave to dry based on the instructions on your selected paint bottle.
Ah, the finished product! I, for one, am extremely pleased with the results of my first ever official and unofficial DIY. Unfortunately, I foolishly lost the clipping of my inspiration for this jacket inconveniently just before posting this post, but I'm really satisfied with how my jacket has captured it's essences.
The phrase on the back of my jacket comes from the John A. Shedd quote, "A ship in harbor is safe, but that is not what ships are built for." I changed the phrase a bit to make it more literal for the sake of my jacket and to give it a titch more of an edge, but it really has a deeper meaning to me. I grew up with this quote surrounding me - my parents said it, I say it - and I enjoy it's meaning. From a young age it has taught me that taking risks is important, because that's what people are built to do, regardless of whether or not I am safe standing by.
I am planning to wear this jacket over my uniform on the way to and from school when the weather declines into a suitable state this fall. I think it will really create a bit of personality in the uniform since it is a DIY piece - that is, at least until I have to take it off.
Other ideas I contemplated for my DIY Army Jacket were to do doodles all over the back, pockets or sleeves in white, gold and black fabric markers. Also, gold stencils in the centre of the back or down the sleeves would also add a suitably personal touch!
Leave your thoughts in a comment below! Thanks for reading!


Custom jackets with logos serve several purposes, but the primary one is to foster team spirit. A sense of unity and togetherness will foster when everyone wear same such as custom jackets with logo with the same emblem. This is especially crucial for sports teams, where a strong sense of camaraderie may make all the difference in the world.
ReplyDelete